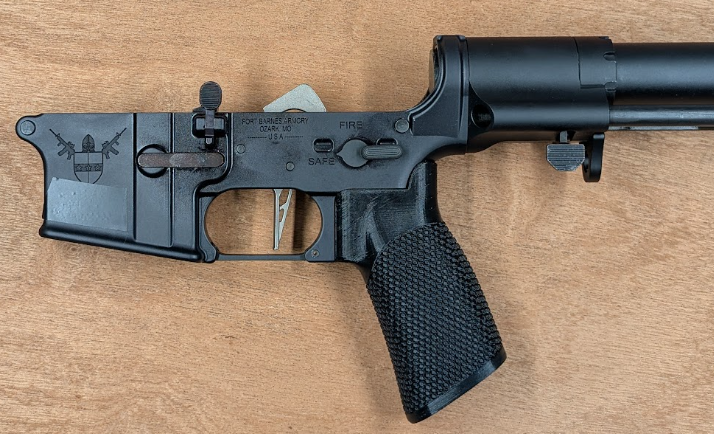
MARC Installation Guide
Overview of components
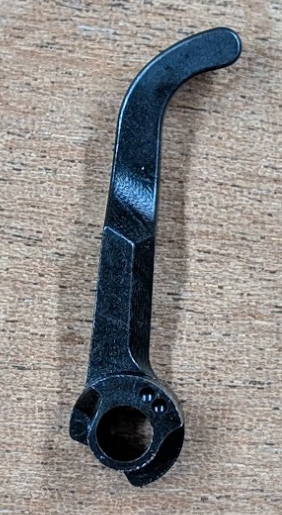
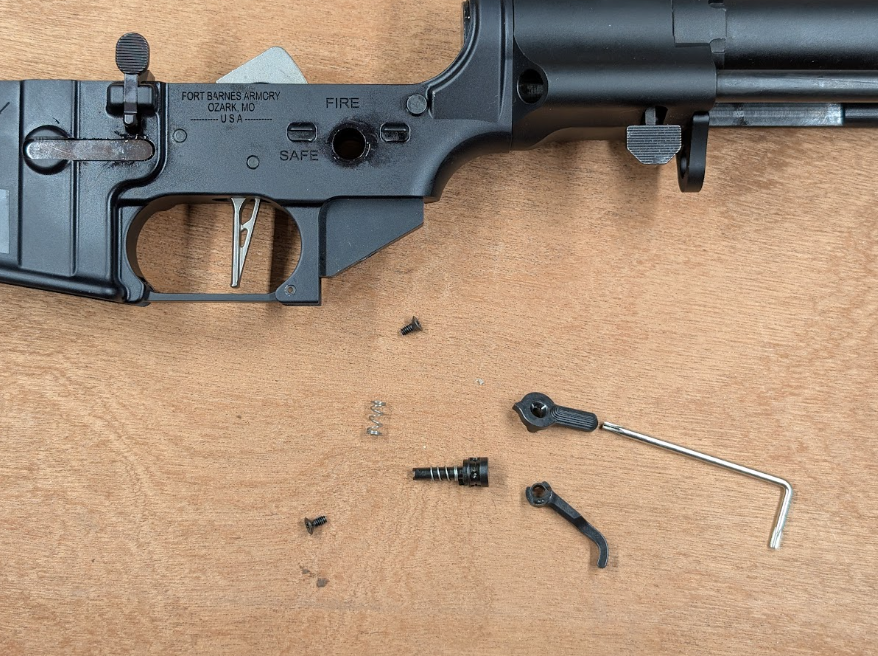
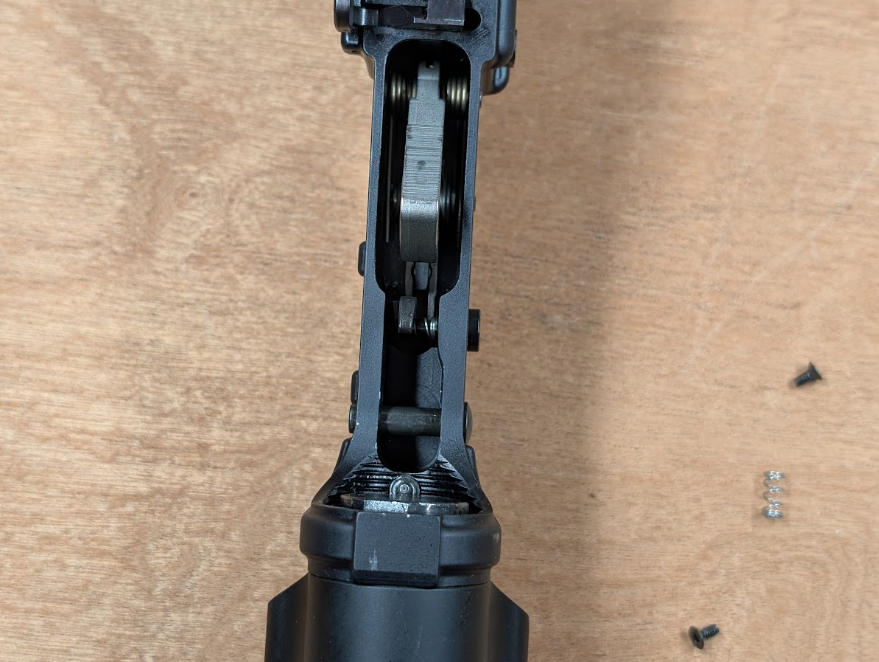
Shaft
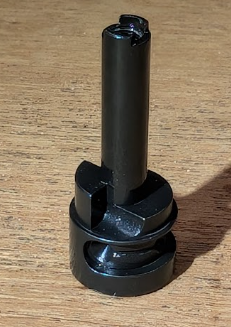
The shaft is milled from 4140 steel, nitride coated. When rotated to the safe position, the shaft itself blocks the trigger from the right side of the firearm. Do NOT use a “super safety” modified trigger with the MARC as your firearm will NOT have a safe position. The end of the shaft indexes with the switch and has threading to receive the screw.
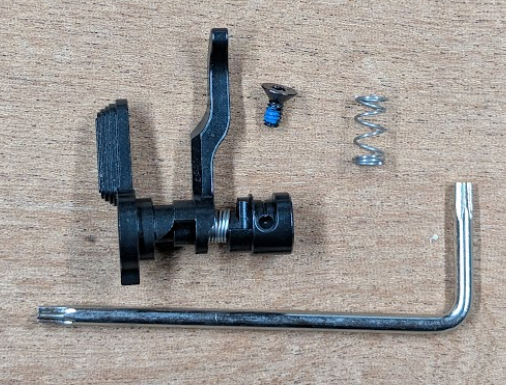
Lever
The lever is milled from S7 steel. It is our own unique geometry. The dots on the round portion indicate which version: one dot for gen 1, two dots for gen 2. Gen 1 has a resetting surface diameter of 0.071” (matching competitor’s geometry and the larger diameter of a milspec selector) and can be ordered separately for use with triggers which have been modified to work with competitor’s FRS systems. Gen 2 (the standard version) has a resetting surface diameter of 0.033”, which matches the smaller diameter in the middle of a milspec safety.
Different levers from differing manufacturers will work with different sets of triggers. The resetting surface geometry is critical, and any tolerance or dimensional change will affect functionality. Our list of compatible triggers is here [insert link].
Spring
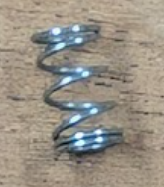
MARCs ship assembled, with a spare spring in the package. We are currently on our 3rd revision of spring. Any small spring of about this size will work, in the event that you lose both, you can likely use a mechanical pencil or pen spring in a pinch.
The spring forces the lever to the left side, out of the way of the trigger on the safe and semi positions.
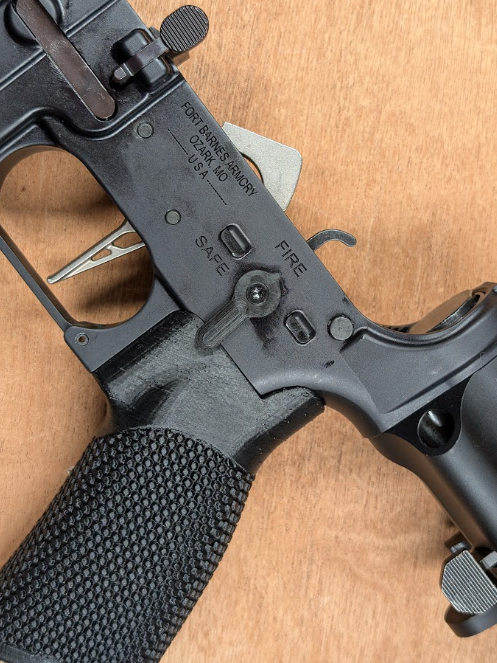
Switch
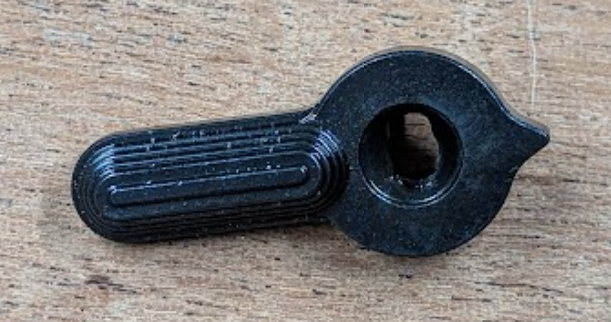
The switch is the user interface. It latches on to the shaft and rotates the shaft through the different detent holes. When moving the switch from semi to the active reset position, the switch cams the lever against the spring towards the right of the firearm to engage the trigger.
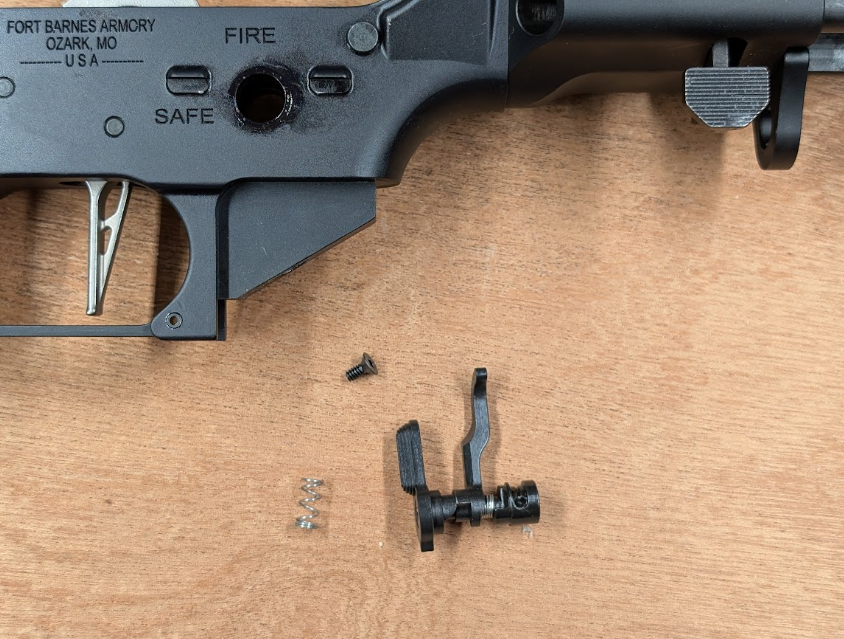
Screw & Driver
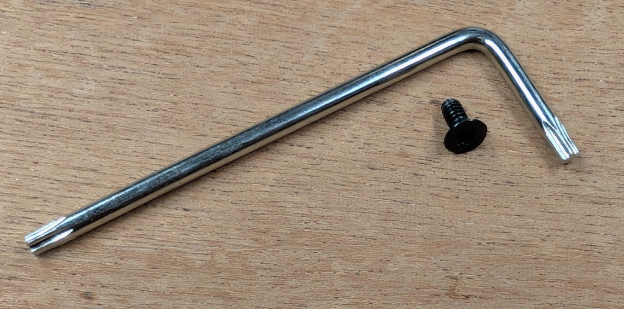
The screw is a 4-40 screw with a T-10 socket. The screw comes with a medium strength thread locking compound on it. DO NOT OVERTIGHTEN the screw. 10-15 in-lbs is plenty (like 75% of thumb all the way tight on the short end). The screw is BY FAR the weakest link of the MARC system, but we bought 200,000 of them so that’s what we’re stuck with. If you overtighten the screw, the head may shear off. In most cases, the screw can still be removed from the shaft with very thin needle nose pliers. If it cannot be removed, we will warranty it ONCE.
Spare Parts
As mentioned above, each MARC is sold with an extra spring and screw in the package. Additional spare parts may be purchased here [link]
Installation Guide
Be Smart

No, seriously. Clear the firearm, ensure that there’s no live ammunition, etc. Don’t win a Darwin award. Along those lines, the first time you fire it in active reset mode, think about only loading at most 3 into the mag so you don’t shoot the ceiling or the skyline.
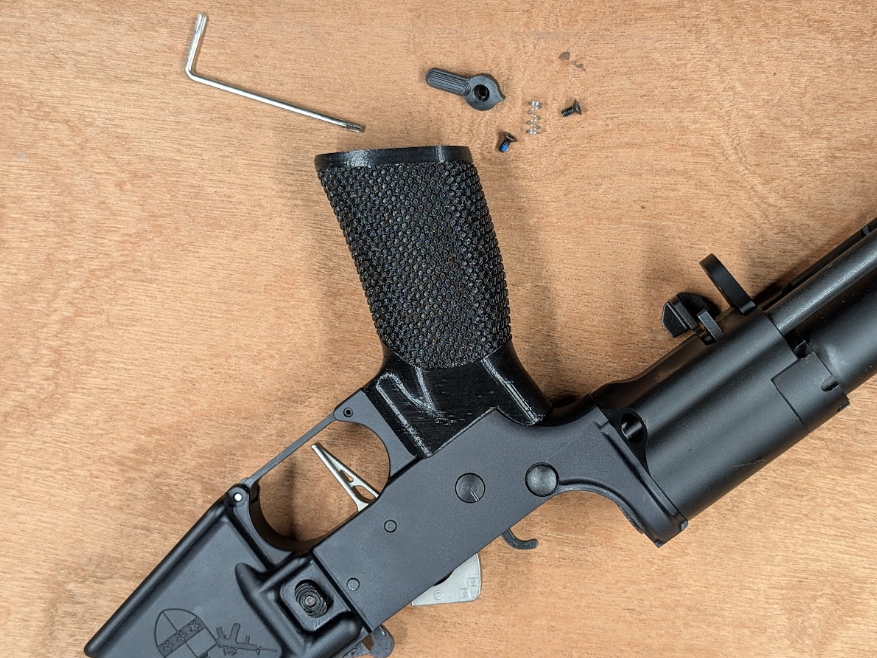
Recommended Tools
Depending on if your pistol grip has a flathead screw or the common 3/16” hex socket, (or some other strange fastener) you’ll need one of those to remove the pistol grip. Other than that, the included T-10 Torx driver (the same bit on many red dots, for example) is all that is needed.
Removing Existing Parts
After verifying that your AR is unloaded, remove the upper from the lower and set it aside.
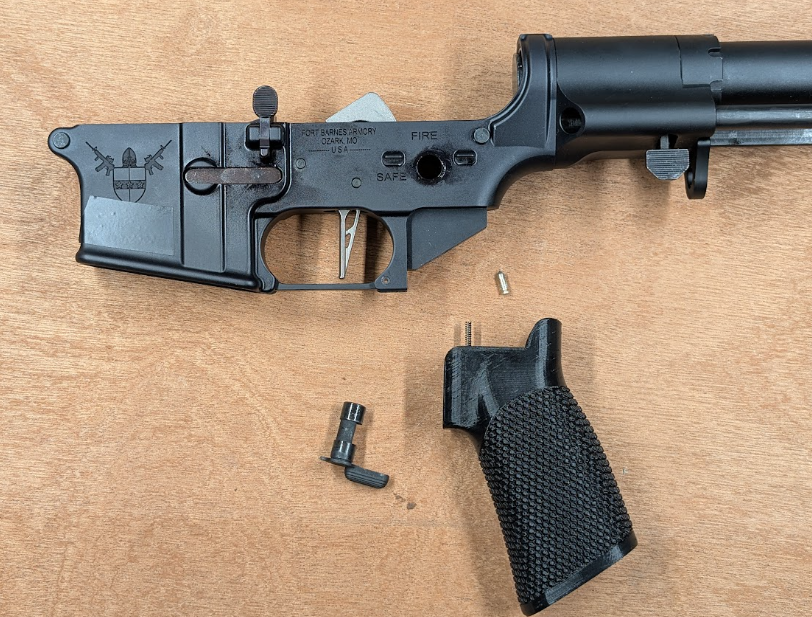
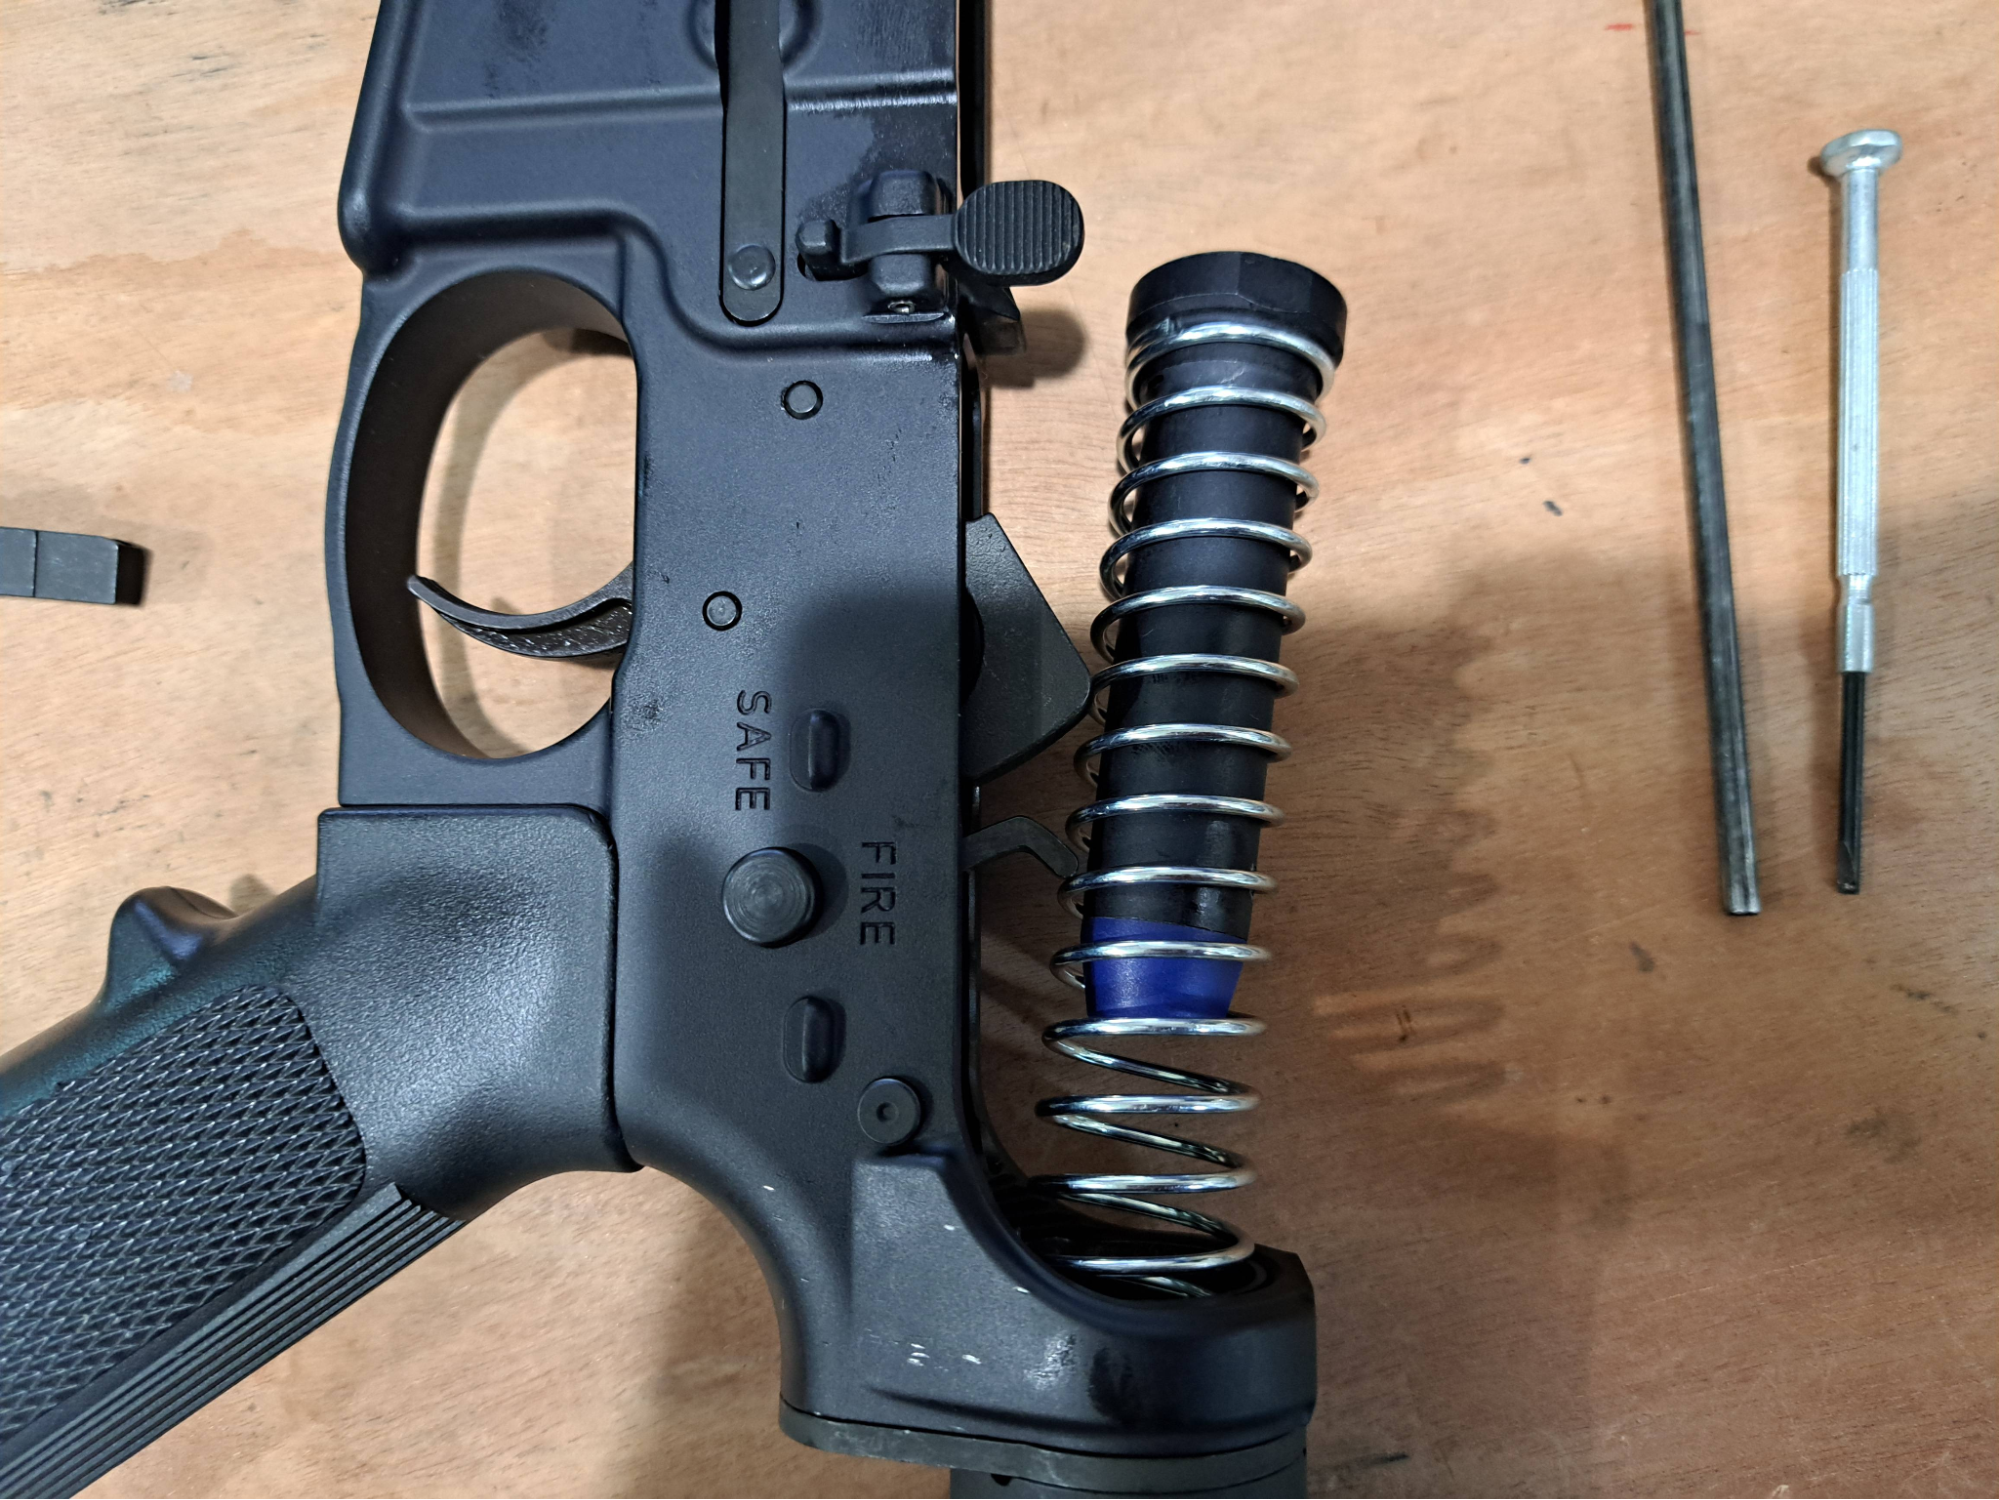
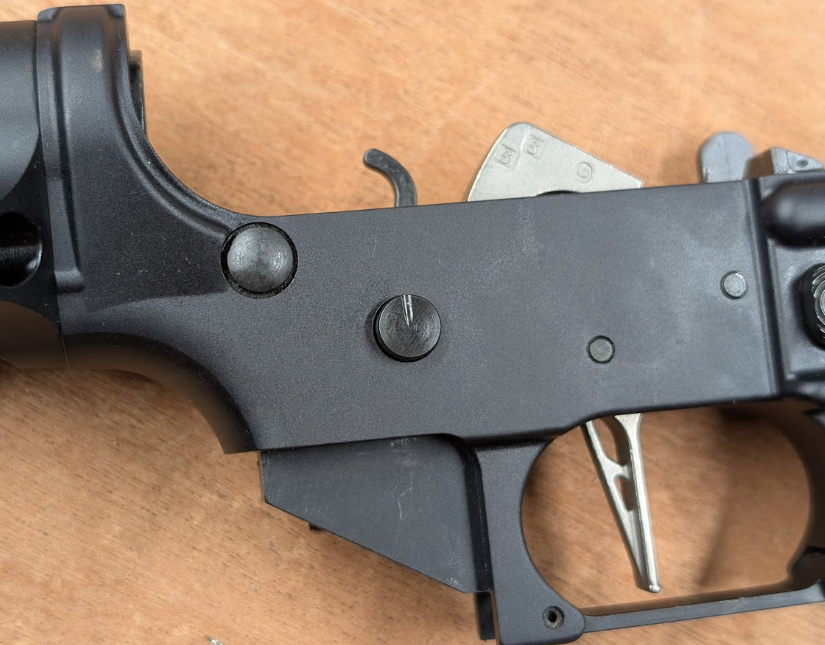
The safety is held in by a detent which itself is held by a spring seated in a hole in the pistol grip. Placing the lower on its left side, remove the pistol grip via the screw in the base. Make sure to keep the screw head flush against the end of the grip so that the screw doesn’t come out- it’s a pain to get it back in the hole, particularly if it’s a flat head. Be careful to not lose the spring or detent.
When the screw is completely out, I leave it and the safety detent spring in the grip and set it aside. Depending on how dirty and oiled your lower is, the safety detent may not want to come out. Let gravity help you here while you toggle the safety lever to get the detent to move. If it is very stuck, you can use a magnet to get it out, or push it out with the end of a paperclip from the hole where the safety was.
Installation of the lever, shaft
Take the MARC apart by unscrewing the screw holding it together. Be careful not to lose parts.
THE HAMMER MUST BE COCKED FOR THIS PORTION
Place (or leave) the spring on the shaft. Place the lever into the lower with the tongue of the lever pointed backwards. You can push the round portion of the lever into the safety hole on the left side of the AR. Next, feed the shaft with spring on it in through the safety hole from the right side, through the hole in the lever.
Rotate the shaft so that it is on the semi position (the notch pointed up).
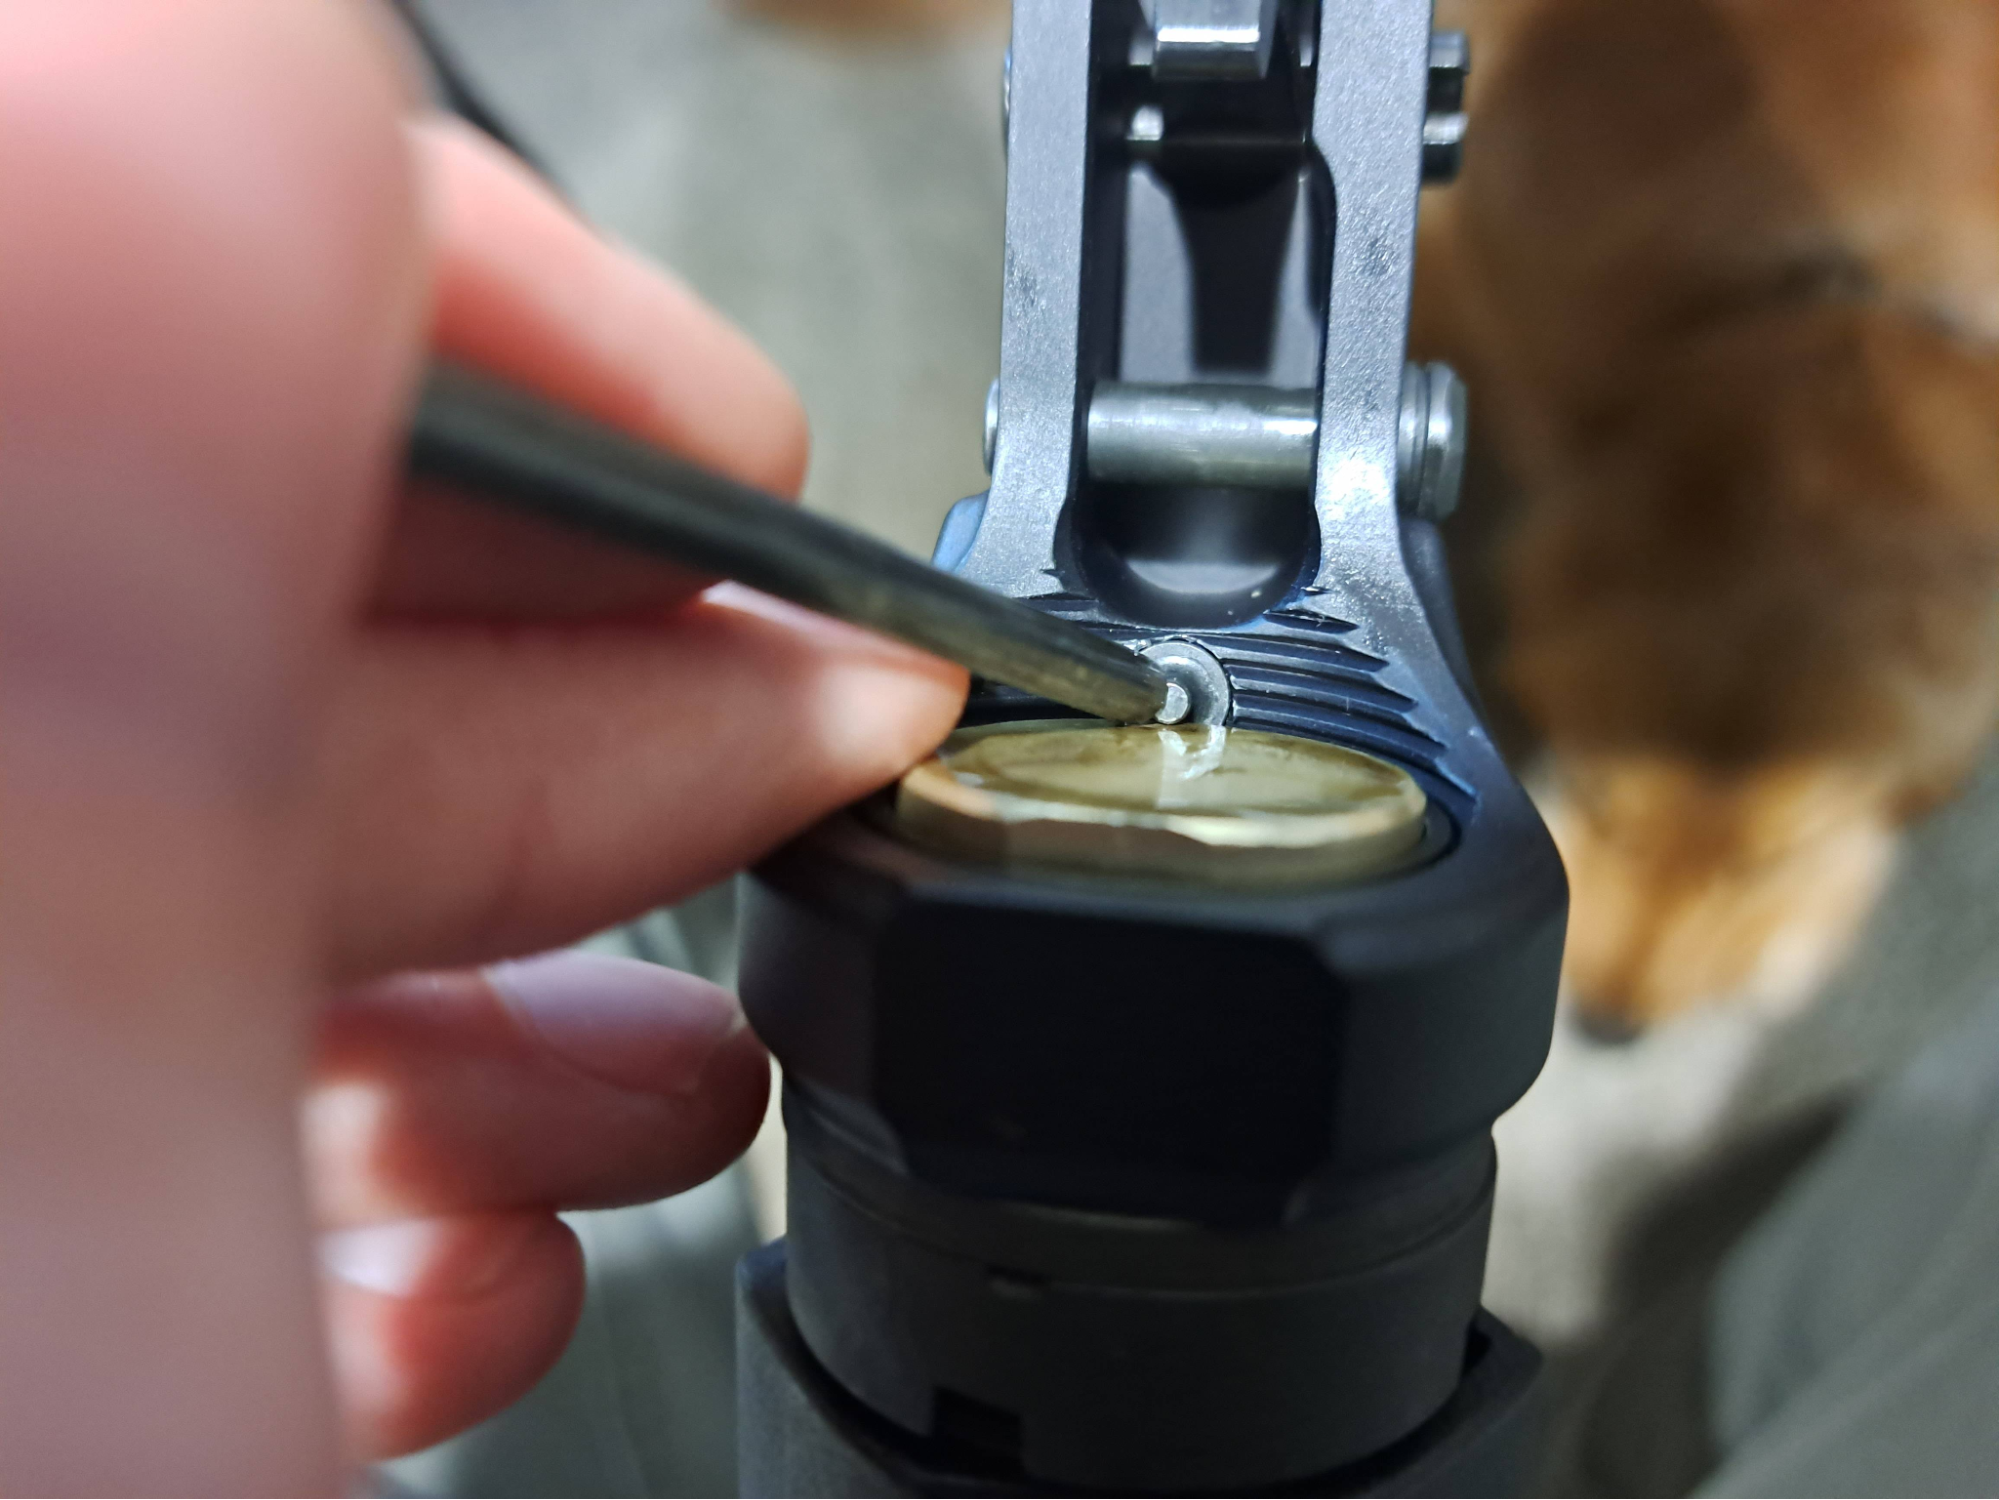
Tilting the receiver onto its left side, and holding the shaft flush with the right side of the receiver, insert the milspec/pointed safety detent into the hole where it goes, while still holding the receiver on its left side so the detent doesn’t slide out. Next install the pistol grip by screwing it in, making sure the pistol grip spring is still where it goes. Once the safety detent spring is putting pressure on the safety detent, everything will set into place and be captive and you don’t have to hold things in place anymore.
Installation of the switch
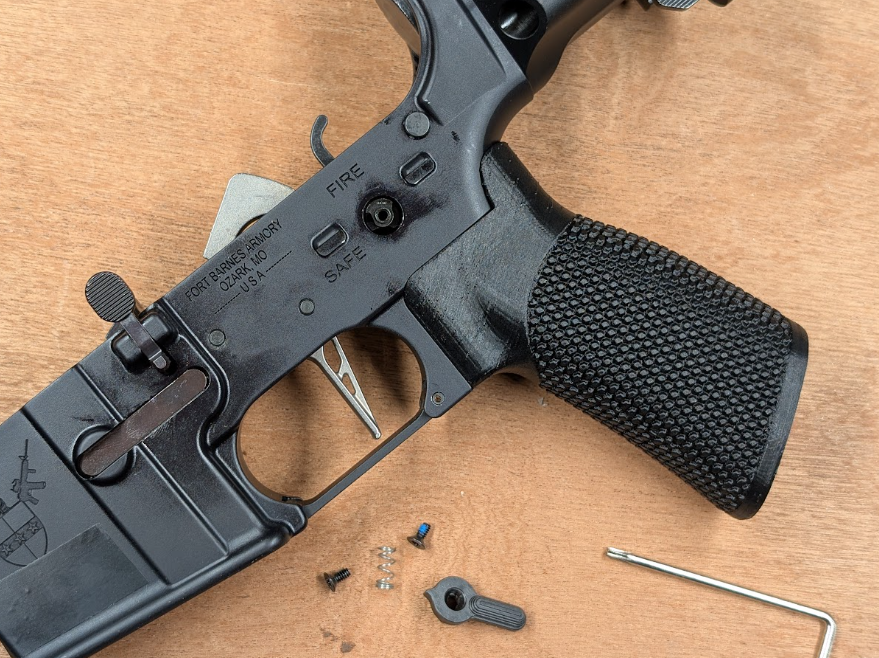
Double check that the shaft is in the semi position. Lay the receiver on its right side.
The switch should fit nicely into the shaft. You will have to hold it against a little bit of spring pressure. Install the screw, being careful to not cross thread or overtorque (10-15 in-lbs is sufficient).
Changing Buffers
See [linked buffer article] for information about buffer weights. If you need to change buffers, now is the time to do so. To do this, depress the buffer retainer pin down with a punch (or your fingernail if you’re brave). The buffer and spring will come forward out of the receiver extension (AKA “buffer tube”.) Pull out the old one, put in the new. Now is a good time to apply grease to your spring so it isn’t so loud while it cycles. Red grease is fine, slather it up, it won’t hurt anything. Finally, push the buffer back into the tube and it is done.
Function Testing
Pending
Common Issues and Troubleshooting
Bolt carrier group stuck in rear
This is the most common hiccup with the MARC is experienced directly after installation: you go to charge your gun and the bolt carrier group (BCG) sticks in the backwards position. This has a number of causes and simple solutions. You can tap the muzzle of your gun onto the ground and that should release the BCG.
Causes: Lack of clearance with the bottom of the upper
Comments:
[Insert Picture of modified Upper]
Firing in bursts / light primer strikes
Your gun fires just fine and normally in semi automatic mode, but gets only one or a few rounds off before it stops in forced reset mode? You manually cycle the gun and a live round comes out with a light primer strike? Great! The MARC is working as designed! You are experiencing bolt bounce. As your bolt carrier group (BCG) travels back into battery, it bounces off your barrel. As soon as the BCG is all the way home, you pull the trigger and the hammer begins to fall. The hammer doesn’t instantly drop though, and by the time it does and it hits the firing pin, the gun is out of battery. If you open the pivot pin of your gun after a stop and the hammer is not cocked, it’s bolt bounce.
[Link Buffer discussion here]
MARC does not reset the trigger
There is a rare issue with some triggers where the MARC will function correctly when dry tested with the upper off, but will fail to reset the trigger with the upper on. This is due to the tail of the trigger shoe having incorrect tolerances with the MARC lever. When this occurs, it is usually because the tail of the trigger shoe is too rounded, and causes the lever to move forward on its own due to upward force of the trigger, rather than being pushed forward by the BCG. The effect is that the BCG resets the hammer, resets the trigger, and on the forward stroke the lever follows the BCG back forward and allows the trigger to be pulled again while the BCG is still holding the hammer down such that the hammer catches on the disconnector again.
Unfortunately, we do not know of a fix at this time for this issue, a different trigger will have to be used.
I fire once then I can’t and it’s stuck on safe / The lever doesn’t go back forward
If your bolt carrier group isn’t pushing the lever back forward, it is because you are using a “semi auto” bolt carrier group. Replace with a full auto cut bolt carrier group.
Unable to pull trigger in third position
With the lever all the way forward and the switch set in the 3rd position, if you are unable to pull the trigger it is due to tolerance issues with your trigger tail. In operation, the MARC lever rotates backwards and the bottom of the lever pushes forwards against the trigger tail to engage the safety and reset the trigger. On the forward stroke of the BCG, the lever rotates forward, and the bottom of the lever rotates backwards, out away from the trigger tail. If the trigger tail is too long (sticks too far back), the lever will not be able to rotate out of the way to release the trigger and it will be stuck on safe in the third position even with a closed bolt. Note that the MARC is on safe when the switch is set to the 3rd position when the bolt is out of battery - this is what resets the trigger.
Cause: Either poor tolerance to begin with of the trigger shoe, or the fact that molds wear out and as they do, cast parts increase in dimension. The MARC is made to work with *most* triggers in *most* cases, as many as possible. This means that unfortunately, some triggers (often lot-to-lot not model-to-model) will not work.
Fix: It is possible to sand the back of your trigger tail to make it slightly shorter. Take a little off the back (like 0.005”) at a time, keeping the top radius the same. The back of the trigger tail, not the top of the back of the trigger tail. This will usually work to fix the issue. If you go like 0.050”, you’ve likely gone too far. The trigger should still be functional and safe with a regular selector, as long as you don’t go too far.
If you have further questions, send us an email!
Email Us